web analytics

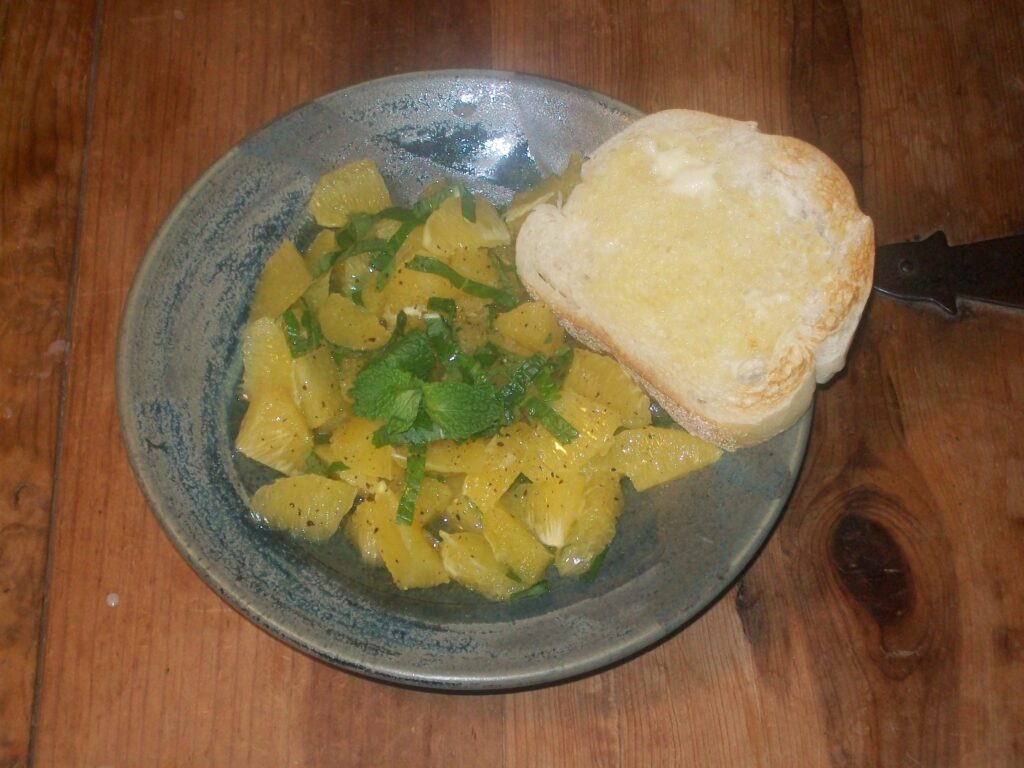
Nsalata di Aranciu (Orange Salad)


It’s hard to believe that this simple Italian salad has such a unique flavor from common ingredients. You have to taste it to believe it!

I grew up eating this with crusty, homemade Italian bread still piping hot from the oven. My mother served it around Christmas and into January.

Ingredients

3 oranges

Sprigs of fresh mint leaves (but dried will do)

A good drizzle of cold pressed, extra virgin olive oil

Pinch of Celtic salt

Freshly ground pepper (a must, as it makes the whole dish sing)


So easy…….

  • Peel the oranges, cut into bite sized pieces and smash down so they extrude their juice. (When the olive oil is mixed with the orange juice, it makes the salad’s distinctive flavor.)
  • Cut mint into ribbons and intersperse on top of the oranges
  • Drizzle olive oil over the mixture, add salt and  pepper to taste and mix well
  • Serve in a festive dish


Mangia!

__________________________________________________________________________________________________________

My health philosophy combine sound nutrition, like this delicious salad, with the curative power of homeopathy.  To schedule a free 15-minute conversation with me, contact our office.


Finally, Gluten-Free Granola

Sunflower seeds have become the darling of my pantry. Wait until you taste this granola that makes my family smile and makes me relish how clever I am!


Actually, I’m not all that clever. I have to give full credit to a great little company in Vermont that I recently learned about called Honest Body. They offer a full selection of different flavors of granola.


This young husband/wife team uses only the purest ingredients, and I urge you to order granola from them.


My version isn’t nearly as perfected as theirs, but it’s pretty good.


I guessed at their recipe.

• Start with a few pounds of raw organic sunflower seeds.
• In a large mixing bowl, cover the seeds with at least 4 inches of water and let them stand overnight for up to 24 hours.


• Strain the water and spread the soaked seeds as thinly as possible on cookie sheets.
• Place the sheets in a dehydrator or low oven at 110 degrees for approximately 24 hours…or until thoroughly dry.


• Once the seeds are dry, toss them into a large mixing bowl and start adding the fun stuff…coconut shreds, cinnamon, vanilla extract, Celtic salt, raisins, chopped dehydrated fruit, such as apples or prunes, chopped walnuts, sesame seeds, etc.


That’s it!


I store my granola in a glass container, and it doesn't need to be refrigerated because it’s eaten within a few days.  Delicious!

_________________________________________________________________________________________________________

My signature philosophy is that health is not  random.  After you've tried my delicious recipe, consider contacting my office to schedule a free 15-minute phone conversation about adding homeopathy to your health strategy.


Back to School? Time to Kick Food Choices Up a Notch!

Oh, the flurry of excitement of back to school time!

Shiny, new school supplies and autumn clothes.  Let’s take this opportunity to make a fresh start with our children’s meals as well.

I urge my students to reassess their dietary habits yearly,  just like a corporation regularly evaluates its efficiency and productivity.  I urge you to clean house and consider potential culprits that may be silently attacking your child’s health.

Too many refined carbohydrates are detrimental to good health and one of the worst offenders is gluten-laden foods.

I know, I know.  Cakes, cookies, biscuits and such are attractive, tasty and inexpensive, but if your child can’t overcome certain health challenges, including emotional and/or intellectual ones, these might be likely to blame.

I often recommend that a child abstain from ALL gluten products for 60 days.  I don’t mean fewer of these products, or smaller bites of them.  I mean totally eliminate them from his diet.

Unfortunately, this means not only  Cap’n Crunch has to go, but otherwise wholesome oats, wheat, spelt and rye must be eliminated as well.  Instead, try delicious hot cereals such as teff or quinoa; they make a lovely breakfast along with eggs.

Substitute rice pasta for wheat/semolina.   Tinkyada Brand is good source of many kinds of pasta.

As an Italian American, I can tell you that if you cook this pasta according to the directions, it tastes authentic.

After the 60 day fast, allow your child a gluten feast!   For example, give him wheat toast for breakfast, a wheat bread sandwich for lunch, a bagel for a snack, and pasta for dinner.

Now watch his behavior, sleep, respiratory and gastrointestinal activity.   Note his energy, his color, and his odor.  Is there darkness under his eyes?   Is he wiggly, itchy, too chilly or warm?

If you notice any of these changes after gluten has been reintroduced into his diet,  then you will know that the child is sensitive to gluten and must be kept away from it.   The same experiment can be done for any suspected food sensitivity such as pasteurized dairy products, sugar cane, corn syrup, dyes or preservative-laden foods, etc.

Here’s a powerful clue: the food that most often does the worst harm is the one that’s the most craved.  Does your child cry or carry on when you tell him he must have eggs instead of toast?  If so, then regard gluten a possible culprit.

Homeopathy has a history of resolving the problem.  If gluten intolerance is part of the family history–something that his father and grandmother have– he’ll still be able, in large part, to overcome this tendency.  It’s a matter of selecting the correct and deep-acting constitutional remedy that is person specific.

Interestingly, in my experience, I’ve observed a proclivity for gluten intolerance more often in Italian-Americans and Irish-Americans.  I’ve also noted that many children don’t present this problem until they’ve been treated with antibiotics, vaccinations or the like.

If you’re working with a classical homeopath, every symptom, no matter how minute, is important to disclose; it will help your homeopath determine the constitutional remedy that will uproot the propensity for this problem in the first place.

After all, getting to the bottom of the problem is what homeopathy does best!

_______________________________________________________________________________________________________

Nutrition is fundamental to the work I do with homeopathy!  Read more about how the correct remedy helped to bring Liz's diet into alignment here.  Lots more articles and free information on homeopathyworks.net.


True Soup

“Anyone who tells a lie has not a pure heart, and cannot make a good soup.”

Leave it to the great Beethoven to mix morality with soup. (A tall order for his distressed servants, no doubt!)

Allow me to be “pure-hearted” here and share a recipe that represents a key nutritional foundation with a symphony of possibilities. This soup base is the foundation of every well prepared soup imaginable. Plus, it is free of MSG and preservatives that flavor many store-bought broths and soups.

I start with roasted bones and end with a gorgeous stock.  I find that the most delicious and nourishing stocks are those made from a variety of bones, so plan to save your roast chicken, roast beef, pork, lamb, buffalo and rabbit.

Here’s what else you’ll need:

4 lbs (approximately) of bones (carcass, head, feet, cartilage, antlers, etc)

4 or more quarts cold, filtered water

½ cup vinegar, distilled or raw

2 apples, halved

3 onions, halved

3 celery stalks, halved

3 carrots, halved

Several sprigs of fresh thyme

1 tsp dried green peppercorns, crushed (optional)

1 bunch parsley (optional)

Once your roast has been served, add approximately 4 quarts of water to the roasting pan and scrape the bottom to infuse the drippings into the mix. Toss in any additional bones, heads, feet, etc. and add the remaining ingredients. Be sure that the bones are covered. If not, add more water.

I like to include apples and onions because they impart a sweeter aroma to a stock that might smell gamey otherwise. Vinegar is necessary to draw out the calcium, magnesium and zinc from the bones and render the bone stock more nutritious.

Then, set the pot to simmer for 12-72 hours. Skim off the scum and discard. The pot can remain on the flames for an entire 72 hours or turned off nightly, left at room temperature and reignited in the morning. Once strained, the stock can be frozen.

While it’s still on the stove, this stock can be used as a base for a myriad of soups.  You might find that the stock doesn’t have a particularly appealing aroma but it will taste delicious after it’s strained and used to cook with.

With this base, you can offer “medicine in a bowl” in tandem with the other, family-pleasing meals you serve day after day.


Anatomy of a Cracker

I’ve made a little discovery.  I can make crackers in infinite flavors and with a myriad of ingredients.  They can be high or low carb, gluten free or include lots o’ gluten. They can be savory when I add cheese and olives, or sweet like graham crackers when I use a touch of cinnamon and maple syrup. And since I realized how easy they are to make, I’ve been making crackers nearly every night for the last few weeks.

I think it’s my new hobby.

Now, when someone asks me “So other than being a homeopath, what do you do for fun?  I say “I’m a cracker-head.”

Familiarizing myself with the components of a cracker was the first step.   I learned that crackers are forgiving.  You can add just about any nut, bean or grain flour with some flavoring, add a liquid, roll out and bake and you’ve got something on which to serve cheese or to spread almond butter.   Last week I added Pecorino cheese, cracked pepper and chopped garlic.

They were Italian crackers.

Then one night, I added rosemary from my garden, melted coconut oil as part of the liquid and tons of shredded coconut.

These were herb crackers.

When I included cinnamon, nutmeg, cloves and chopped almonds they tasted like Dutch Windmill Cookies (Speculaas).

Heavenly.

‘Don’t have tapioca flour?  No problem, just use more almond flour.  ‘No gelatin?  Don’t worry, skip it.  ‘Don’t like poppy seeds?  It’s ok.  Just add sesame seeds instead.

The only caution I found to be noteworthy, is that you don’t want to use too much liquid or they’ll stick to your rolling pin.   It’s hard to say exactly how much is just the right amount without knowing if you’ll be using coconut, almond flour or such. Each has its own idiosyncrasies and they require adjusting for more liquid or less.  So, I learned to eye ball it.  A mealy type consistency is the best so that the dough can roll out easily.

But again, crackers are forgiving.

So, if you add too much liquid, just toss more dry into the bowl until it feels as though it will roll out nicely.

Yummy Gluten Free, Low-Carb Crackers

Preheat oven to 250°

  • 1 cup coconut flour
  • ½ cup tapioca flour
  • 1 cup almond flour or meal
  • 1 cup flax meal
  • 2 cups coconut flakes
  • ½ cup poppy seeds
  • ¼ cup gelatin
  • Celtic Salt, to taste
  • About 2 ½ -3 ½ cups liquid ( water, lemon juice or  yogurt whey)

In a mixer, or a large bowl, combine the dry ingredients.  Add the liquid and mix until mealy.

Roll out the mixture between 2 pieces of parchment paper. Until it’s 1/8” thick or less.

Peel off the top layer of parchment paper and place the batter layer still on the parchment paper onto a cookie sheet.  You want the parchment to be underneath the dough directly on the cookie sheet.  Score the dough into the shape of crackers.

Bake until slightly golden, then flip, allowing the paper to release, so that the crackers are now directly on the cookie sheet.

Bake until crisp. Depending on the amount of liquid and type of flour, it may take up to an hour or so until they’re crunchy.

I keep mine in a glass container with a tight plastic lid in the pantry.  So far they’ve stayed fresh, but I think that’s because my family eats them so quickly that they haven’t a chance to get old.


The Only Eggnog Recipe You’ll Ever Need. Period.

Leave those tacky cartons at the grocery store. Wait ‘till you taste this rich and nutrient dense version of eggnog! This drink will offset any other holiday beverages, which by the way, are not as health supporting.

What you and your family deserve this Christmas is rich, thick eggnog that’s loaded with live enzymes, nutrient dense vitamins and of course, deliciously good cheer.

The quality of the ingredients add a superb benefit, but are not necessary.  Go with the highest quality you can find such as raw, organic milk and cream and free range egg yolks. If the eggs are not free-range, try to have at least organic.  Eggs eaten raw should not be conventionally produced.

Here’s what you’ll need:

12 free range eggs

6 cups raw milk

2 cups heavy, raw cream

1/2 cup raw honey (my 1st choice, because of the accompanying raw enzymes, but maple syrup will do, too.)

1-1/2 teaspoons freshly ground nutmeg, plus more for dusting


Here’s what you do:

Submerge the eggs (still in the shell) in a large bowl of very hot water plus a few drops of dish soap. As the water cools; wash and rinse, then wipe the eggs dry.

Separate the egg yolks and place them in a mixer together with the honey and beat for 10 minutes. Refrigerate the egg whites (you’ll need them later). Allow the egg yolk mixture to cool in the refrigerator for up to 8 hours.

30 minutes before you plan to serve, mix the milk into the chilled yolk mixture. If you plan to add brandy, this is the time to stir it in. Along with this, add in 1 -1/2 tsp nutmeg.

On high-speed, in a separate bowl, beat the cream until stiff peaks form.

In yet another bowl, beat the egg whites until you have stiff peaks. Gently fold the egg white mixture into the egg yolk mixture, then fold the cream into the egg mixture.

Ladle into frosted glasses and sprinkle with the remainder of nutmeg.   Serves 8 cups.

Oh, yum.


Ho-Ho-Ho! Munch. Munch.

Wouldn’t you love to give a great gift this Christmas? I have three suggestions this year. They’re homemade and delicious, but don’t worry, that doesn’t mean you’ll be slaving over a hot stove!

These are easy, but beware.

You’ll want to make a couple extra batches for yourself.

  • Chutney…Kick it up a notch when you add a little spark to an otherwise docile fruit preserve. Fruit chutneys look beautiful and taste festive, too.  Use apples, and try seasoning with cumin or coriander.

Or how about oranges with chili peppers? There are countless variations. Pour your finished product into clean, glass canning jars and for a personalized touch, make your own labels. Here’s a basic recipe for Cherry Chutney from Sally Fallon’s book, Nourishing Traditions:

4 cups ripe cherries, pitted and quartered

½ teaspoon coriander seeds

½ teaspoon whole cloves

Grated rind and juice of 1 orange

1/8 cup Sucanat

¼ cup whey

2 teaspoons sea salt

½ cup filtered water

Mix cherries with spices and orange rind, place in a quart-sized, wide-mouth mason jar and press down lightly. Mix remaining ingredients and pour into jar, adding more water if necessary to cover the cherries. The top of the chutney should be at least 1 inch below the top of the jar. Cover tightly and keep at room temperature for 2 days before transferring to refrigerator. This should be eaten within 2 months.

  • Vanilla extract…This universal favorite makes a great, long lasting gift. And, to top that, it’s easy to do. Check out my recipe here! Every time your loved ones add a teaspoon into their latest batch of cookies, they’ll think of you.
  • Slow Roasted Holiday Nuts…Choose your favorite nut or a selection of only raw nuts (almonds, hazelnuts, pecans, walnuts, Brazil nuts, cashews, peanuts, etc.) and soak them overnight and for up to 24 hours. Drain and spread the nuts on cookie sheets and sprinkle with Celtic sea salt. You can season them with a variety of herbs or spices, such as cinnamon, cayenne pepper, cumin, chili powder, nutmeg, cloves, etc. Slow roast them in an oven preheated to 150° F, for 6-8 hours or until crispy. Place in little paper bags and tie with colorful ribbons.

Enjoy!


Follow Joette


Books & CDs

Joette’s Materia Medica

I designed it especially to provide a framework to guide you through your remedy choices. It is perfect for busy mothers and others who love curing their families themselves.

Protect Yourself from the Flu

Deal with the flu without drugs and expensive commercial products.

Combo Pack: Top 7 Products

Go from clueless to clued-in…in the fastest way possible.

Cell Salts: Learn Homeopathy at Home

The easiest, safest and most inexpensive way to treat your whole family.

Homeopathy in First Aid

Learn to choose the correct homeopathic remedy to give on the way to the emergency room or better yet,
avoid the trip altogether.

Cure Yourself and Your Family with Homeopathy

Homeopathy is inexpensive, non-invasive and profoundly curative.

Secret Spoonfuls: Confessions of a Sneaky Mom with Kid Pleasing Recipes – CD & Booklet

Boost and maintain optimum health with simple foods, instead of vitamin pills.

See More Products

Download Your Free Flu Flow Chart

My mission is to provide you with useful information to make your family life easier through healthy empowerment.

Your Flu Chart is on it's way to your inbox